Christmas is a magic time for Americans. Unless you're a doctor or a plumber, you're pretty much guaranteed a day off from work. So, as a family of Jews who aren't stressing over trees in the living room and gifts for the neighbors, it's the perfect time for a family get-together. And what does any good family do when they get together? They eat!
We started our festivities backwards - with home made cake and ice cream to celebrate my niece Zivah's first birthday. Zivah will turn one on December 30th, but since her parents are abandoning her in favor of warmer weather, we had a party early. Her mother made her an adorable lion-faced cake (which she had absolutely no idea what to do with) and we made Peppermint Chocolate Chunk Ice Cream from scratch. This was my first foray into the world of making ice cream from scratch, and I found it to be pretty easy. Not so easy that I want to make it every night though, which is a bonus for my waist line.
After a lovely Christmas Eve dinner of sushi, we all tumbled off to bed to awake early the next morning. This had less to do with hopes of gifts from Santa and more to do with the fact that small children seem to think that 6 a.m. is an appropriate time to wake up during vacation.
On to prepare Christmas dinner!
On the menu this year:
Herb-rubbed Prime Rib Roast
Roasted Root Vegetables
Balsamic-Honey marinated Ostrich Fillet (yes, you read that right)
Dry Rubbed Steak Tips
Broccoli Souffle
Dessert:
Treacle Sponge (see below)
Apple/Pear/Cranberry puff pastry pie.
You'd think we live in some sort of dystopian society in which you only get meat one day a year, huh? Actually, there was a coupon to a butcher involved.
OK...
Here is my resolution for next year: LEARN TO FOLLOW DIRECTIONS.
For example, when the recipe for the roast says to cook at indirect heat for 1 1/12-1 3/4 hours and after an hour and a half it's still not to temperature, DO NOT listen to your mother when she says to turn on the middle burner. Why not? Because the GRILL WILL CATCH ON FIRE. And with the grill, the meat will also catch on fire. This will all cause me to stare at the grill, holler at the house, and when I realize that nobody can hear me and therefore is coming to rescue me, turn off the grill and remove the still flaming prime rib. I put it out with the pot holder.
Amazingly, the roast turned out ok, a little more cooked than I might have wanted and not with the exact kind of crust I wanted, but it was pretty good. The rest of the food was as well. The ostrich even grew on me. My favorite were the steak tips though, which goes to show that anything dry rubbed with chipotle chili powder is the way to my heart.
OK, the Treacle Sponge. I've wanted to make a treacle tart since Harry Potter came out ten years ago. Of course, until about five minutes ago, I didn't actually know what treacle was. I now know that treacle is the burnoff from molasses, but the stuff you make treacle tart out of is really golden syrup.
I couldn't find golden syrup, but, at the last minute, in the British food sections of the Mashpee Stop & Shop, I did find Treacle Sponge Pudding in a CAN.
That you cook IN A CAN. Although I have been raised to be wary of things you boil in a can for 35 minutes, I have to admit, it was pretty good.
All together, it was a nice Christmas dinner. I have now eaten enough to not have to eat again for a week. Or until later. Where is that goat cheese...
Saturday, December 25, 2010
Monday, December 20, 2010
The Reindeer Cookies
Now, I know what you're thinking, why would a good Jewish girl like me, be making reindeer cookies? And it's a good question. UNTIL you actually see the cookies, which are so cute I couldn't resist. I found them on Bakergirl's blog, where she made creating them appear to be extremely easy. I found that not necessarily to be the case, but I got through it.
Look at these things, just look!
Are they not the cutest cookies you've ever seen?
Look at these things, just look!
Are they not the cutest cookies you've ever seen?
Basically, they were the cutest cookies ever, and I had a Christmas party to go to, so I figured it was a match made in heaven. They were quite a hit with the kids. And being that they were peanut butter cookies, I didn't kill anyone, so I considered it a double success.
I think Bakergirl's came out better than mine because her cookies were smaller and she had smaller chocolate covered pretzels. I would definitely recommend that. I had to hold the bigger ones in place for a few seconds to ge them to set. Also, since my cookies were bigger, I had to put the noses lower. The first few dozen I made ended up looking like bears with red noses.
All of that aside, the recipe is awesome. The cookies came out smooth and soft, which is normally an issue I have with peanut butter cookies, so this will definitely be my go-to recipe from now on. Everyone at the party, as well as the staff at Metrorock seemed to enjoy them!
Reindeer Cookies
from Bakergirl
3/4 cup peanut butter
1 1/4 cup firmly packed brown sugar
1/2 cup shortening
3 tablespoons milk
1 tablespoon vanilla
1 egg
1 3/4 cup all-purpose flour
3/4 teaspoon baking soda
3/4 teaspoon salt
Chocolate-covered mini pretzels
Mini brown M&Ms
Regular-sized red M&Ms
Preheat oven to 375°F.
Combine brown sugar, peanut butter, shortening, milk, and vanilla in large bowl. Beat at medium speed until well blended. Add egg; beat until just blended.
In a separate bowl, combine flour, baking soda, and salt. Add to creamed mixture at low speed. Mix just until blended.
Form dough into 1-inch balls. To make reindeer-shaped cookies, pinch the bottom of the ball slightly to form a point, then gently flatten with your hand. Space cookies about 2 inches apart on a greased cookie sheet and bake for 7 to 8 minutes, until set or just beginning to brown.
Remove from oven and immediately (and gently) press two mini pretzels into the tops of the cookies for the reindeer's antlers. Press two mini brown M&Ms in for the eyes and one red M&M for the nose (or any other color... some of mine ended up with green noses. They might be South Pole reindeer.).
Allow to cool 2 minutes on the baking sheet and then transfer to a wire rack or paper towel to cool completely.
Makes about 40 reindeer cookies.
Source: Peanut butter cookie recipe from Jif.
Sunday, December 12, 2010
The Tea at L'Espalier
In lieu of getting each other gifts we would inevitably return this year, my friend Kim and I decided to celebrate the holidays by going out for a fancy meal. We settled on afternoon tea and after asking around, it seemed that L'Espalier was the place to go for just that.
L'Espalier offers what they call a "fantasy tea party." There are three different tea menus to choose from, all based off of fairy tales and nursery rhymes. Beyond the names, the fantasy aspect is nonexistent. In fact, the whole tea service, though good, was presented somewhat awkwardly. Beginning with our arrival. We came in through the Mandarin Oriental hotel. To get to the restaurant, you walk through the hotel lobby, upstairs, down a hall, through Sel de la Terre (another restaurant) and then into a round vestibule area. In the vestibule, a gentleman took our coats and told us to have a seat in the lounge until our table was ready. Being that we were the only people we could see in the restaurant, and had made a reservation, being asked to wait was somewhat confusing. A few minutes later, the gentleman reappeared and showed us to one of two tables directly off the lounge area, separate from the regular dining area. It was private, which was nice, but it was also a bit like being seated in a hall.
When the waiter arrived, he was dressed in a full suit. It was formal, but also confusing. I wasn't actually sure if he was the waiter or another maitre'd. He described the teas to us in general terms, but offered no leaves to assess.
We both opted for Red Riding Hood's Basket, which is the full tea, sandwiches, tea service and pastries. We also both chose the Darjeeling tea.
The tea came first and was promptly followed by the sandwiches. They had no issue replacing the ham and cheese on my order with a plain grilled cheese. The waiter (dressed in waiter garb) who brought the tea seemed confused about who was getting what and had to return to the kitchen before bringing us the service, making him the first of three waiters who made it half way to our table, stopping and returning to the kitchen and finally returning to our table.
The sandwiches themselves were very tasty and quite filling for the small size. I found the lobster salad to be disappointing, as that it didn't have a lot of flavor and the lobster was stringy.
The maitre'd returned to clear our plates and then another waiter made the halfway to the table, turn, pivot, retreat, re-approach move before bringing us new spoons and then we were served the pastries.
The pastries consisted of a signature L'Espalier swan cream puff filled with mocha cream, an almond cookie with pomegranate seeds, a fig bar, chocolate decadence cake, cranberry scone and panna cotta. Not being much of a sweets person, this part might have been slightly wasted on me, but I enjoyed the chocolate cake, panna cotta and scone. Their having replaced our knives and forks with spoons (of multiple sizes) made cutting the scone and spreading the clotted cream, jam and honey a bit difficult.
Kim, on the other hand, had no issue going to town on the poor swan. The maitre'd/waiter reappeared at one point to refill our tea pots. They let us stay for as long as we liked and eventually seated another couple in our hall/lounge area, which made it only slightly more awkward to be in a small, secluded area with another group so close.
milk and sugar service |
our view |
All in all, the afternoon was lovely, but I think that was more a product of the company and conversation than the tea event itself. While the food itself was tasty, the situation of the table and seemingly confused waitstaff made the whole event something to scratch your head over more than walk away wanting more. L'Espalier has most likely deservedly earned its stars for their food and presentation (which I've never had, way out of my budget), but did not make much of an impression for afternoon tea.
Friday, December 10, 2010
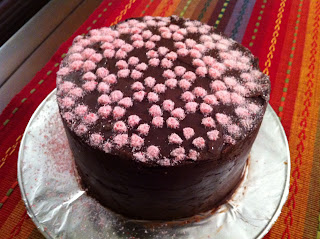
The Stenciled Peppermint Birthday Cake
I am in a peppermint mood! It's most likely because every catalog I've gotten for the past month has been chock full of peppermint bark, peppermint marshmallows, peppermint brownie mix, floating candles, ornaments, cocoa, and well, you get the point.
So, I'm in a peppermint mood and my coworker Karen's birthday just happens to be this week. To be honest, I don't even know if she likes peppermint, but that's what she's getting!
There are four of us who traipse through the laptop and book cart strewn office in the back of the library, and we certainly don't need a whole 8" or 9" cake on our own. Normally, we just bring stuff down to the staff when we're done, but I'm sick of sharing (nobody else does, it's uninspiring). So, this time I decided to make a 6" cake. It's very cute. Of course, I only have one 6" pan, so it took twice as long to bake, but I also got eight cupcakes out of it and I have a party to go to on Saturday night, so it all worked out.
I used a Duncan Hines Chocolate Fudge cake mix (I like cakes mixes!), and subbed half the water it called for for peppermint schnapps. I also used the stick blender to mix it rather than getting the stand mixer out. It turns out both of those were good calls. The cake puffed way up and came out moist and fluffy and it was all way easier to clean up and put away.
I planned on icing the cake with peppermint chocolate ganache and thought I would fill it with whipped cream, then I thought I might as well mix in some crushed up candy canes to the whipped cream. I had crushed up the candy canes the day before for decoration. I'll need them for fudge soon anyway, so now I'm ready.
After a painstaking reminiscence of my childhood with a sieve at the beach, I managed to separate out the larger pieces of crushed candy canes from the very fine powdery remains. (This will all make sense in a minute)
I used the ganache recipe I have seen as standard (1/2 cup heavy cream, just simmering, to 6 oz of chocolate, pour hot cream over chocolate and let stand for three minutes, then whisk until smooth). I added some peppermint schnapps and creme de menthe to it while whisking.
OK, so the mystery of the candy cane powder will now be solved. A few weeks ago, my friend Anne asked me if I wanted a set of cake stencils that someone sent her and she didn't need (she already had two sets). I said sure and have been waiting for a chance to used them. I decided this was my chance. I used the little flowers one and I think it came out alright. It's a little fuzzy around the edges, but the stencil was meant for a bigger cake and I chickened out rather than pressing it down. The stencil was surprisingly easy to use, though I never would have thought to spray it with non-stick spray without reading the directions. Finally, something to be said for directions!
I think it looks kind of like flowers that have been lightly snowed on.
Thursday, December 9, 2010
The Thanksgiving Desserts
We've been doing Thanksgiving with the same general group of people on the Cape for about six years now. One year, we actually ended up with just about a dessert for every person attending. Since then, it's been a bit of a joke, can we actually have a dessert per person? I think it's really just because everyone in my family and extended family likes to bake. This year we had some new additions, like the chocolate bread pudding (thanks Ben!) and sweet potato pie.
My brother Dave always comes up with a magnificent dessert that he blesses us with. This year it was rice pudding baked in a sugar pumpkin. That way, you could scoop out the rice pudding and tender pumpkin filling. Yum!
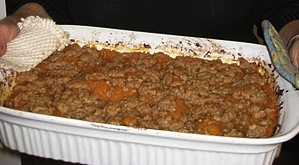
Bourbon Sweet Potato Pie |
Candied Cranberry and Chocolate Tart |
Clockwise from the bottom right: apple crisp, pumpkin pie, pecan pie, sweet potato pie, chocolate bread pudding, cranberry chocolate tart. |
Rice pudding baked in a sugar pumpkin. |
The Extremely Late and Extremely Long Thanksgiving Post
Sorry about the lateness of this post. I kept putting it off, but plan on doing some baking this week, so thought I should probably get my act together before then.
Thanksgiving this year was a magnificent success. I was told that it was the best menu to date and that all the flavors complemented each other perfectly. It also was a small Thanksgiving, with only 13 people rather than our usual 20-25. Thirteen people is a lot easier to deal with and meant that we could get all the food on the table at the same time and piping hot. And when I say piping hot, I'm not kidding. My father's complaint in the past was that by the time the food got onto the table it wasn't hot anymore, which was a valid complaint, but this year we fixed that. The cure? I think it was having the turkeys finish cooking an hour and a half early. Made us move a little more quickly on the other items...
This year we made two turkeys. We got two because we wanted the kosher all natural and the biggest they came was about 16lbs and we never have enough leftovers. They were named Fred and George (after the Weasleys, my mother's choice). We always name them and by the end of the cooking process, I always end up referring to them as Bubba and Joe. One (George) was brined overnight in a water-salt-beer solution and they were both cooked on the grill. They were done about 90 minutes before I expected them to be and they came off perfectly after sitting for a bit. (Like wings fell off in transfer from pan to cutting board perfect). I also seem to have mastered carving. It was a good turkey year.
First Baste |
Second Baste |
Third Baste |
Done |
Carved! |
I also mastered gravy, for the first time in my whole life. The day before I boiled some mushroom stock, chicken stock, celery, onions, rosemary, sage and whatever else I could find. Then on the day of I boiled the necks in other water, mixed it all together, added the drippings and some cornstarch and it was like magic. Seriously, gravy is what stresses me out on Thanksgiving, and it was perfect!
Other items on the menu:
Classic stuffing with celery, onion, cranberries and apples. |
Wild mushroom stuffing |
haricot verts with roasted fennel and shallot |
herb mashed potatoes |
sauteed parsnips and carrots with honey and rosemary |
Butternut squash with maple streusel topping |
All of these recipes were altered slightly. Some to take out the dairy (we do a kosher meat meal), some because they taste better and some because I used all the rosemary in the gravy stock without remembering it was supposed to go into the carrots...
For desserts, click here.
Sunday, November 14, 2010
The Anadama Bread
I learned today that is something called Anadama Bread that is a traditional New England bread made from molasses, corn meal and flour. This was only slightly embarrassing because I like to think of myself as traditional New England (except for the salt pork in baked beans, bleh), and I had never heard of it before.
I will also admit that my excitement over the discovery of Anadama bread was really encouraged by the misreading of it being Adama bread, and therefore the bread that Admiral and Lee Adama shared around their Caprican breakfast table. Imaging my disappointment in discovering that I was wrong about the name of the bread and a super huge Battle Star Galactica dork all in one day!
I decided to make it regardless of my Edward James Olmos disappointment and have been delighted in the process. I used the first recipe I found, which isn't my norm, but I was working on an iPhone and lacked the attention span to look at the tiny screen for too long. I was surprised to see that the recipe called for no eggs and I wasn't sure my corn meal-molasses-butter combination was the right consistency, but it all came together well and is currently baking away in my oven, I'm sure inspiring jealousy in the hearts of all of my neighbors who are smelling that fresh-baking-bread scent (of which I'm sure there is no better).
It turns out that those old school New Englanders knew what they were doing too, because this stuff is quite delicious!
Sunday, November 7, 2010
The Fiesta! Cake
Today was my nephew Bryce's 9th birthday. He had a Fiesta! themed party complete with Zumba instructor, pinata and a Fiesta! cake.
I wasn't sure what to do for this cake when I first volunteered, but I knew it would involve bright colors and a sombrero. I also had images of chili peppers and cacti, but those didn't materialize.
I have to give my mother credit for the baking of the cake. She volunteered because I was running short on time. When I was in sixth grade, my birthday party activity was to have all of my friends decorate mini doll cakes. It was very cute, there were many different colors of icing and each girl got a cake skirt with a doll pick in it and got to decorate it and take it home. My mother also made me a doll cake as a birthday cake that year using a bundt pan and my Skipper doll's torso and head. We put her legs back on after, but she was never the same.
I digress.
The point of the story is to say that because of that party almost 20 year ago, my parents own a mini doll cake pan. In our house it's known eloquently as the "boob pan." That's right, we're classy.
Anyway, she made cakes in the boob pan, a small round circle and a 9x13 sheet cake. I tunneled out the middle of the small round and used icing to stick one boob cake to it, voila - Sombrero! I put the sombrero on the sheet cake. Then I crumb coated the whole thing and put it in the fridge to harden. Decorating it was fun and the whole thing came together quite well.
Maybe next year he'll have a desert themed party. I'll get that cactus in somehow...
Friday, October 29, 2010
The Caramel Swirl Cheesecake
It was my brother's birthday yesterday, and I decided to make a cheesecake. The original plan was to make a caramel swirl cheesecake and cover it with the chocolate ganache that was leftover in my fridge. When it was done though, it was so pretty that I couldn't bring myself to cover it.
This was the second cheesecake I've ever made and I have to say, it was delicious. Even with the de-fattening steps I took.
In case you didn't know, I have some major fat-content psychological issues. Therefore, when a friend sent me his mom's famous cheesecake recipe that called for 5 tubs of cream cheese and 6 eggs, I had a little bit of a nervous breakdown. I found a recipe on Cooks Illustrated for a Rich and Creamy cheesecake and decided to go with that instead. Actually, on CI, there were three recipes: rich and creamy, light and fluffy, and dense and firm. They all called for the same ingredients, but did different things with the eggs and oven temperature.
The recipe called for four 8 oz packages of cream cheese, four eggs, heavy cream and sour cream. I used two packages of regular cream cheese and two of 1/3 less fat cream cheese, three eggs and one egg beater and low fat sour cream. Next time, I'll do the whole thing with the less fat cream cheese. This cake was so rich and good that I don't think it needs the extra goodness.
I also bought a jar of caramel sauce (mine never comes out as well as the store-bought stuff), and swirled it into the cake right before baking. I wasn't sure how it would effect the chemistry and baking, but it worked out perfectly.
Pics below, recipe's at the bottom. Sorry the pictures are so dark, I used the big flash, but I guess it didn't work.
Serves 12-16. Published September 1, 1995.
Ingredients
1 | tablespoon unsalted butter , melted |
3 | tablespoons graham cracker crumbs |
2 | pounds cream cheese |
1 1/4 | cups granulated sugar |
4 | large eggs |
1 | teaspoon lemon zest from 1 small lemon, minced |
2 | teaspoons vanilla extract |
1/4 | cup heavy cream |
1/4 | cup sour cream |
Instructions
- 1. Adjust oven rack to middle position and heat oven to 325 degrees. Line bottom of 9-inch springform pan with foil, tuck foil underneath pan bottom, assemble pan, then pull foil around side of pan, (see illustrations 1 and 2, below). Brush bottom and sides with butter. Sprinkle crumbs over bottom. Tilt pan in all directions to coat evenly with crumbs. Cover pan underneath and along sides with sheet of heavy-duty foil (see illustration 1 of "Preparing For a Bath") and set in large roasting pan. Bring kettle of water to boil for water bath.
- 2. Meanwhile, beat cream cheese in bowl of electric mixer until smooth. Gradually add sugar and beat on medium speed until sugar dissolves, about 3 minutes. Add eggs, one at a time, beating until just incorporated and scraping down after each addition. (If you don't scrape down the bowl after each egg, cream cheese that sticks to the bowl will ultimately show up as lumps in the batter.) Add zest and vanilla and beat until just incorporated. Remove bowl from mixer; stir in cream and sour cream.
- 3. Pour batter into prepared pan. Set roasting pan on oven rack and pour enough boiling water to come about halfway up side of springform pan (illustration 2, below). Bake until perimeter of cake is set, but center jiggles like Jell-O when pan is tapped, 55 to 60 minutes. Turn off heat and leave oven door ajar, using a long-handled kitchen fork or spoon to hold it open for 1 hour longer. Remove springform pan from water bath and set on wire rack; cool to room temperature. Cover and refrigerate until chilled, at least 4 hours. (Can be refrigerated up to 4 days.)
Sunday, October 24, 2010
The Peanut Butter Whoopie Pies
My friend Jen's birthday is Sept. 6th, which pretty much always falls in the busiest time of year for any school teacher. Because of this, she got shafted out of a peanut butter chocolate cake of her own this year. To make amends, I made a peanut butter whoopie pies for her housewarming last night.
I know it seems ironic, but I'm actually not much of a cake person when it comes to eating cake. Whoopie pies do absolutely nothing for me from the ingesting point of view, but they were surprisingly easy and fun to make.
I followed the Martha Stewart recipe for mini pumpkin whoopie pies to get the cookie/cake part. Then I used my regular peanut butter buttercream recipe for filling. Some of them were then rolled in crushed Reese's Pieces. Those thing, by the way, are as good as I remember them.
Cakes baked and matched. Ready to be filled. |
Set up for filling and rolling. |
The final product. |
This one was just for fun. Peanut butter buttercream and fluff for the ultimate fluffernutter.
Subscribe to:
Posts (Atom)