Wednesday, December 28, 2011

Epic End of the Year Post

I have been an epic failure as a blogger recently and for that I apologize.  I blame NaNoWriMo.  You try writing a 50,000 word novel in a month and keep up with your cake blogging as well.

I have found some magnificent recipes over the past two months that I need to share here.

Monster Cookies:
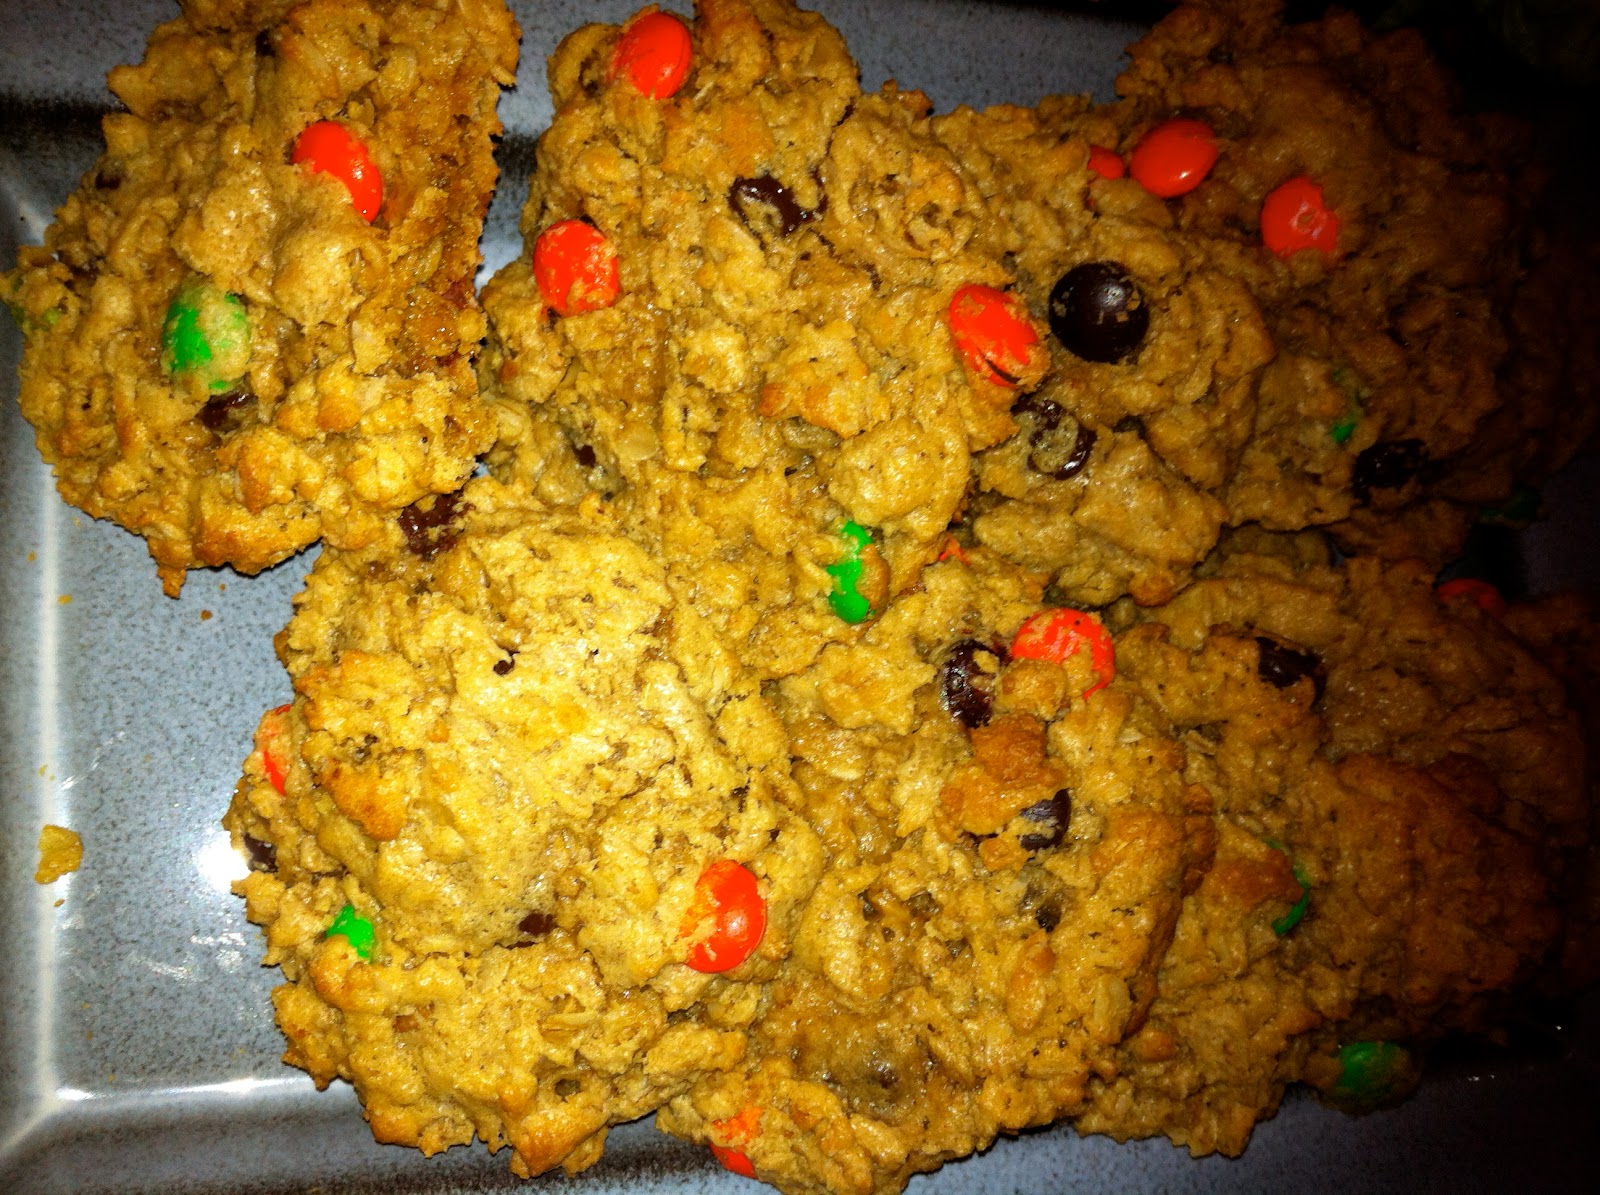
To begin with, I made the most amazing cookies of all time.  They are from the Baked cookbook and are ridiculous.  They are called Monster Cookies, so I made them for Halloween.  I have made them once or twice since because they truly are amazing.  The Monster Cookies are oatmeal, peanut butter, chocolate chip, M&M cookies.  Yes, you hear right, all of those things go into one cookie.  And they are amazing.  They are not super sweet, especially considering what's in them, but they are gooey and chewy and chocolatey and delicious.

As we know, I have issues reposting recipes without permission, but luckily for your guys, everyone else in the world does not share my intellectual property concerns (damn librarianship!).  Here is a link to the recipe on someone else's site.

I will admit that I messed with the recipe a little when I made them the second time.  Shocking, I know.  But in this case, all I did was add Reese's Pieces, in addition to the chocolate chips, M&Ms and all the rest of the stuff.  They only made it more amazing.


The Salted Caramel Brownies
So, remember the Sweet and Salty Cake from a few months ago?  You know, my masterpiece as a baker. Well, it turns out that the Baked boys have a salted caramel brownie recipe that uses that same salted caramel.  So I made them.  And somehow I didn't take a picture, which is really too bad because these brownies are maybe the most amazing brownies I've ever had.

The recipe for these aren't actually in my cookbook, I think it's in the second book they put out.  I have the regular brownie recipe in my book though, and it turns out that to make the salted caramel brownies, you just put a layer of salted caramel in the middle before you bake them.  I had some salted caramel left over from when I accidentally set off my smoke detector three times in one night, so I thought I'd make them.

The reason this recipe is so good is less because of the caramel (which is admittedly amazing), and more because of the 11oz of high quality chocolate and five eggs.  It's actually the reason I am in the process of bankrupting myself with the purchase of Scharffen Berger chocolate.  It really is so much better when you start with a high-quality product.  Who knew?

Anyway, these are delicious.  I made them again in lieu of a birthday cake for a coworker.  They're pretty easy to make too, if you have a better knowledge of non-fire-inducing caramel chemistry than I do.  Or if you already have the caramel in your fridge.

Here's a link to the recipe on some other rule-breaker's website.

The Double Chocolate Peppermint Crunch Cookies
So, it seems that I have no only been failing as a blogger recently, but also as a photographer, because I have no picture of these cookies either.  I can link you directly to a website for the recipe for this one though, so I think I get points for that.  These cookies were pretty amazing.  They had the consistency of brownies on the inside, but the firmness of a cookie on the outside.  I also used the better (Scharffen Berger) chocolate to make them.  Also, from my perspective, there is very little you can do wrong with melted 60%+ chocolate, cocoa powder, chocolate chips and crushed candy canes.

The only thing that's persnickety about this recipe is that you have to drizzle the baked cookies with melted chocolate and then put on crushed candy cane pieces.  That being said, it was a pretty easy recipe to make.  I found these to be great to keep in the freezer.  I had a last minute holiday party and was able to pull out a bunch of them and bring them over.

This is the picture from the Epicurious website.  Mine actually looked pretty much the same.

The Chocolate Peppermint Chanukah Cake
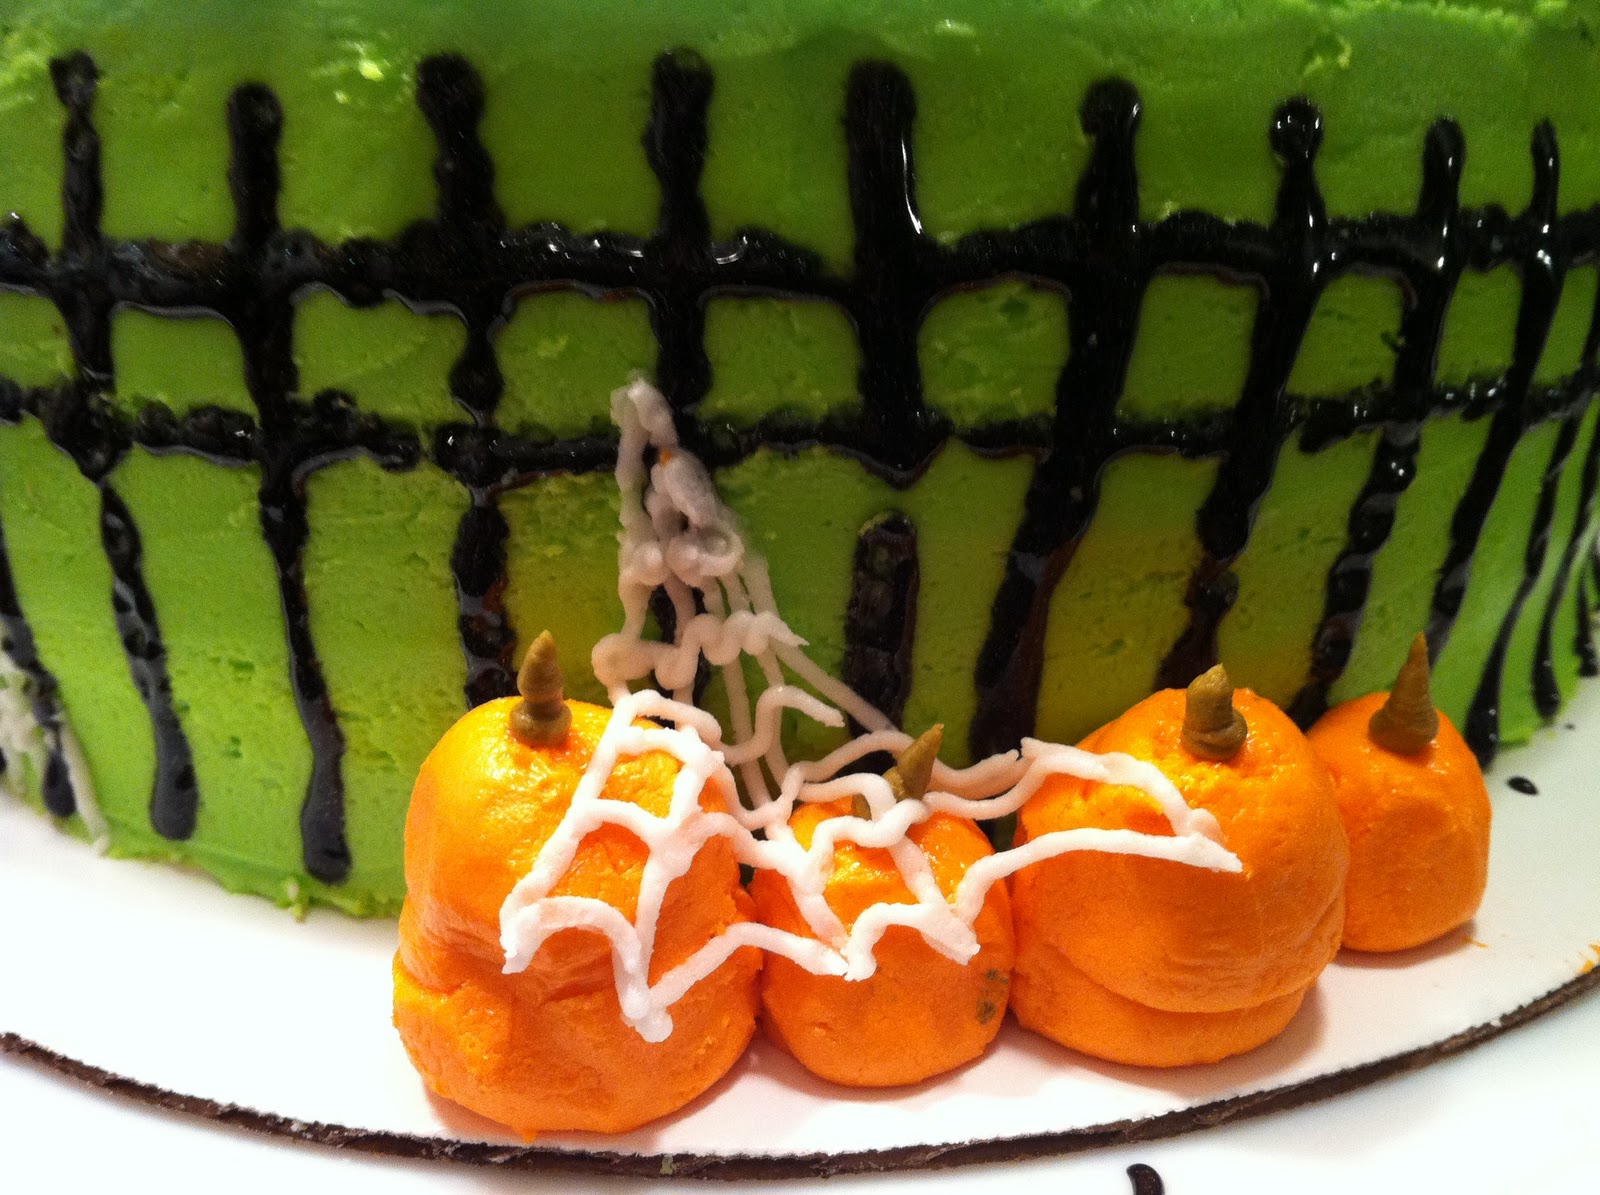
At Thanksgiving, when I was all high on cooking and praise, I volunteered to make a cake for our family Chanukah party.  Three weeks later, when it came time to make the cake, I was a little baked out, but I persevered!  I was in a peppermint mood (see above and below), and decided to recreate the Zivah Lily cake, which I actually now know is a Baked recipe, even though I didn't know it then.

I made the cake and peppermint ganache.  I used peppermint schnapps only in the ganache instead of a mixture of peppermint and creme de menthe.  For the buttercream icing, I didn't have the energy to make the recipe from the book (which I now owned), and so I cheated.  I am openly admitting this on the Internet too, so now everyone knows.  I had some icings from previous recipes in my fridge, so I mixed it all together, added some butter, more sugar, a bunch of schnapps, and a large amount of blue food coloring.  It actually came together quite nicely.  It was remarkably fluffy and smooth.

I put the cake together with the three layers of chocolate cake, a layer of buttercream, layer of ganache, and so on.  I frosted the whole thing with the ganache.  The ganache


Not really sure how this next part happened, but I applaud my family for their sense of architecture and balance.

The Peppermint Gift Boxes
Each year at the holidays I give gifts to some of the people who work in my school.  I strongly believe that by keeping the custodial and production center staff in sweets and treats makes my working life a far more enjoyable experience.  Usually, I make chocolate peppermint fudge and it goes over well.  One time I made chocolate-dipped candied grapefruit rind, but that didn't go too well.  Turns out not everyone shares my slight obsession with grapefruit.

This year, I went with the old standby of fudge, but kicked it up a notch by adding white and dark chocolate peppermint bark as well.  I also found some pretty silver cupcake boxes that were perfectly sized for the gifts.  I boxed them up and they were met with great acclaim.  I am happy to have done my part to keep people fat and happy this holiday season!


The Fougasse
In the French bread baking class I took in October, we learned how to make something called a Fougasse, which is basically a French focaccia.  You make it by making two balls of dough and forming them into teardrop shapes.  Then you put a bunch of garlic oil, blue cheese and rosemary on top of one layer and the second layer on top of that.  The you coat that with some more garlic oil and yummy stuff and then you snip it in all kinds of snazzy ways until it turns into a leaf.  It was actually pretty easy to make and tasted amazing.

This is the one I made in class:


And this is the one we made for Thanksgiving:


The Apple Pie
Remember in October when I dragged my friends apple picking?  We went to that place in the middle of nowhere and there was a lot of traffic and then I forced them all to take a wide variety of ridiculous pictures and somehow ended up getting a bunch of apples chucked at me as I stood there innocently.  My friends love me. (I know this because they continue to come apple picking every year as long as I organize it).

Anyway, you know that part that comes after apple picking when you get home and you have 8,000lbs of apples and you unload them all over your counter and then you kind of stare at them for a while.  And they stare back.  And you start imagining ways you can cook them and then you start imagining ways you can cook them without having to peel them because everyone knows that peeling apples is pretty much the worst thing ever?  Well, this pie came right about then.

Honestly, I don't remember how I made the pie filling.  It involved sauteing the apples with some brown sugar and I want to say either bourbon or spiced rum.  Spiced rum is likely, because that sounds like something I'd like better with apples.  I do know I used the best pie crust recipe in the world.  It's the Cook's Illustrated vodka pie crust recipe.  You put vodka in the crust because it does magic with the gluten content.  That's right, it's magic.  (Magic is what I call things like chemistry and math I don't understand).  Anyway, here's the recipe and some pictures of my beautiful pie.  Christmas weekend it finally got to come out of the freezer and get cooked.  It was delicious!

Recipe:

  • 2 1/2 cups (12 1/2 ounces) unbleached all-purpose flour
  • 1 teaspoon table salt
  • 2 tablespoons sugar
  • 12 tablespoons (1 1/2 sticks) cold unsalted butter, cut into 1/4-inch slices
  • 1/2 cup cold vegetable shortening, cut into 4 pieces
  • 1/4 cup cold vodka
  • 1/4 cup cold water


So, that's it for me in 2011.  I'll be back on track come the new year!

Monday, December 26, 2011

Stop 28: Arizona Jalapeno Cheddar Cheesecake

Hey, remember a long time ago when I decided to make every recipe in a particular cookbook and blog about it?  Yeah, I'd forgotten about it too.  But look, here's a new post.  And it's all about cheesecake!

The cake for Arizona is a Jalapeno Cheddar Cheesecake.  I assume this is because southwestern cooking is known for having smokey and spicy things in it, like jalapenos.  This cheesecake was the most interesting cake I think I've ever made, not from the creation perspective, but more from the "when the heck would you serve this?" perspective.

I was going to a wine and cheesecake party (what's that you say, the best party idea you've ever heard of? me too), so I was all set with the where to bring it.  I'm still not 100% sure when I would serve it in "real life" though.  The thing is, it wasn't really sweet.  And it wasn't really savory.  It was the perfect mix.  

The recipe calls for a corn chip crust, which follows the same general idea of a cookie crust, but with corn chips instead.  It was pretty ingenious, and tasty.  The filling was an interesting mix of chopped jalapenos (for which I totally asked the guy working at the bagel shop for plastic gloves so I wouldn't make the same mistake I made the last time I tried to chop jalapenos and then couldn't put my contact lenses in without crying in pain for two days), shredded cheddar cheese, cream cheese, and, well, sugars.  There was turbinado sugar, white sugar and brown sugar.  So it was sweet.  But it was savory.  And a little bit spicy.  In actuality, it was kind of awesome.  

You bake it in a 9x13" dish, which made the serving a little bit odd.  Since I was bringing it to a party, I decided to cut it and plate it up before going.  I topped each piece with a slice of fresh jalapeno, which Brown recommended to let people know what was in it.  That part didn't seem to work, but it looked cute.  It was met with great esteem as well.  By the people at the party, my brother, my mom, the guy who works at the bar who ate half the container I had with me.  My father wasn't a big fan, but you can't please everybody all of the time.  I think I would make the recipe again, maybe for a brunch.  Or a super bowl party.  If it wasn't so aesthetically confusing, it might go well with chili.  In any case, this one's going in the recipe box.


Thursday, December 8, 2011

The Gravy (and the rest of Thanksgiving in photos)

I know I'm a few weeks late with this and everyone is now onto thinking about other holidays, but I needed to talk for a few minutes about my Thanksgiving gravy.

My Thanksgiving gravy was AMAZING.

Gravy has always been a bit of my arch nemesis on Thanksgiving because I do a dairy-free t-day and everyone seems to write recipes filled with butter and cream.  I decided to forgo everything I read and just go with my own knowledge and experience.

When I grill my turkey, I put it in a roasting pan (this is because without a roasting pan your grill will catch on fire.  Trust me on this one.) and then fill the pan about a third of the way up with apple cider.  As the turkey cooks, I refill the cider once or twice.  The turkey steams in the cider and tastes even more delicious.

What I did to make the gravy this year was to take the neck, giblets and heart and put them in a saucepan covered in a mixture of water, boxed mushroom broth and fresh apple cider.  I don't know the exact amounts, but it was enough to more than cover the meat.  Then I brought it to a boil and let it simmer.  For a long time.  At some point I added some leftover chopped onion from the day before and a bunch of thyme that was also leftover.

When we cleaned out the second turkey, I added the innards from that one and more of the same liquids, brought it to a boil and let it simmer again.  For a long time.

When I took the turkey off the grill (early, of course, because my turkeys are always done early), I took out the innards I had been cooking and added the liquid from the bottom of the pan, which was now apple cider and turkey grease.  It was delicious.  I strained the liquid through a mesh strainer and syphoned off most of the fat.  I used the ice cube trick my grandma taught me.

Once it was strained and defatted, I put it back in the pan and whisked in about two tablespoons of flour.  Then I let it simmer again.  For a long time.

Eventually, as it was getting close to time to eat, I added about a tablespoon of cornstarch.  I now know, from watching Paula Deen, that I should have whisked the cornstarch into something cold and then added that so it wouldn't clump, but because I didn't know that, I just whisked extra hard to get the clumps out.

I let it simmer until it was time to eat and it was delicious.  It was a little bit sweet from the cider and a little bit salty from the meat and the consistency was outstanding.  I was very proud of myself.  I might have eaten some on pasta two nights later, but I'd never tell...

The gravy creation:
This glamorous picture was taken early on in the gravy-making process.  Don't I look adorable?

I cleaned up for the grease-syphoning part.

And lacked confidence for the flour-whisking.

Here are some other fun turkey-day highlights:
My absurdly adorable nieces trying on their turkey hats
The turkey was tender enough to fall off the bone before carving.

Some of the sides (i.e. what we use the oven for on Thanksgiving)
This awesome chocolate pumpkin no-bake thing my chocolatier brother concocted.
Walk on the beach post-meal, pre-dessert (that's the dog, not the Loch Ness Monster, though I can see the confusion)
The answer to the question of whether I had a good time on Thanksgiving.
(Though I swear one of those was for someone else.)

Thursday, November 17, 2011

Deep Fried Thanksgiving: one week out

Since Thanksgiving is upon us and I reposted by holiday advice from '08, I thought I'd just go ahead and let you all into my crazy for a bit.  In all honesty, my crazy now is nowhere near where it used to be a few years back.  I have now learned how to let other people help me in the kitchen and take some of the responsibility. I have also learned about the benefits of the food processor and planning in advance. This way, I no longer have a nervous breakdown on Thanksgiving day and tell everyone that we're having turkey subs next year.  (That happened a few years in a row, but without actually having the subs the next year).

I am a bit behind schedule with my T'day planning this year.  I blame this mostly on attempting to write a 50,000 word novel in 30 days (who chose November as National Novel Writing Month anyway?), taking a few classes and actually working at work.


Planning
To start planning for the T'day menu, I start by looking at old menus and recipes from previous years to see what worked and what didn't.  Sometimes I like to switch stuff up, sometimes we have a lot of repeats.  This year we are going to have some new faces at the table (food wise, the people are pretty much the same).  I keep my menus and my recipes from year to year.  I'll show you what those look like in a bit.  

After I look at my old records, I start scouring the internets for fun new recipes that I think will add something to the meal.  A lot of stuff out there seems to be reinventing the wheel, so I am pretty picky what I add to my menu.  This year, I used my Pintrest boards to collect recipes and pictures I thought looked interesting and tasty.  I love Pintrest.

Recipe-ing
Once I have figured out basically what I want to make, I set up a Word document to keep track of my recipes, their ingredients and directions.  
I use two columns and put the ingredients in one side and the instructions on the other.  This keeps me from having to keep flipping from page to page in a cookbook or magazine.  Having all the recipes in one document is helpful, and numbering the pages keeps me organized.  I have definitely found it useful to put the link of where the original recipe came from on the document.  That way when I see that I transcribed something incorrectly, it's easier to figure out and I don't end up with a meat trifle.
After I have the recipes all typed up (or copied and pasted more likely), I print them out and go through the ingredient lists with highlighters.  I highlight for produce, grocery and perishable.  The next step is to make the grocery list, which I can now do easily because I have used my super organized color highlighting system.  So, after I have scribbled a lot of written really coherent things like: 2 yellow onions +1+1+3, I come up with something that looks a bit like this:

Then I send the shopping list off to my parents.  If you notice, there are no turkeys on my list.  That is because buying the turkeys and figuring out how much we need is someone else's job.  I just cook the stuff...  I also write little notes in the shopping list and other intelligible things like: "Maple Syrup and whatever else we need to make this taste good." Then I cross out things I know we have and will now hope to remember to bring with me.  It works for me.

Planning, part 2
So, the next part of planning is where the aforementioned food processor comes in.  I used to make each recipe from start to finish without taking other recipes I was about to make as well into consideration.  Two years ago I had an epiphany that if I figured out how much of each product I needed in advance, I could prep it all in advance.  So, if I need 2 cups of diced onions for one recipe and 3 cups for another recipe, I can just dice up all the onions in advance and then scoop out what I need when I need it.  It was quite a freeing revelation.

To do that, I go back to the recipe lists and start making notes again of the preparation of different items. The other thing this helps me do is actually read the recipes in advance.  Then I am more likely (though now 100% determined) to avoid those persnickity little things like, "let this chill for 4 hours" two hours before the meal.

Saturday, October 29, 2011

The Halloween Birthday Cake

My nephew's birthday is in the beginning of November and every year I designate myself the official baker of his birthday party cake.  Last year he had a Fiesta! theme party (with Zumba!), so I made the Fiesta! cake.  The year before that there was the slightly disastrous Cupcake Penguin fiasco, for which I was only slightly able to redeem myself with the Iceberg Cake for our family celebration.  

This year he was having a Halloween themed party and I volunteered to make the cake again.  He informed me that he wanted a lemon cake, which I thought was a bit of an odd choice for a 10 year old, but I'm not going to ask anymore questions than I need to.  I had just gotten the Baked cookbook when he mentioned that he wanted a lemon cake and I thought immediately of the Lemon Drop cake from the book.  I then realized that making a three layer lemon cake with lemon curd filling and lemon drop boiled icing for a 10 year old's birthday party might be a bit much.  So, I decided to make the cake from the recipe, but not do the rest.  My nephew informed me that I could just decorate it with "a bat or something," which I thought was very kind of him.  

But, I didn't do that.  
Instead, I found this: 

and I became obsessed.

Now, I am well aware of my limitations and the fact that I refuse to use fondant and gum paste because it tastes gross (and is confusing), but I decided to throw caution to the wind and use the cake from the website as my inspiration anyway.

I made the lemon cake from the recipe and it came out magnificently.  I even used cake flour, because I found some in my cupboard.  I am linking to the dessert girl blog because she got in touch with Matt Smith from Baked and got permission before posting the recipe, which I dig.  Of course, I can't get Matt Smith to respond to anything I tweet at him, so it also makes me a little bitter.  

I made a regular decorator's icing using half butter, half solid vegetable shortening, lemon juice, milk and vanilla.  I discovered that if you follow a recipe, your consistency comes out a lot better.  I filled the cake with the decorator's icing as well as frosted it with it.  It's too sweet for me, but I figured it was going to be eaten by a bunch of kids who didn't belong to me, so I could get them as sugar-hopped-up as I wanted.

The cake was solid and took the frosting well.  I have to say that I was really happy with how the cake came out.  I worked my butt off and was on my feet for over two hours, but I've been doing so little real decorating recently that it made it worthwhile.

I put black cats and gravestones behind a creepy looking iron fence around the outside with some pumpkins and cobwebs, then on the top I put the lettering and a big cobweb and a little spider.  

It was a lot of fun to make.  I hear it tasted pretty good too!  

Here are some pics:


meeeooowww

I think this is my favorite part.


Friday, October 14, 2011

The Peanut Butter Pie and the Sweet and Salty Cake

I mentioned in my last post that I went out and bought this new cookbook giving me something to rave about on the blog for a while.  I bought it in part because of what Edd Kimber had to say about it, but more importantly because I ended up with two birthday celebrations in one day.  I had lots of creative plans for the cake for the birthday dinner I was going to, but once I heard about the Sweet and Salty cake, that settled it without a doubt.  The birthday we were going to celebrate in the afternoon didn't even know it was getting a cake until I saw the recipe for the peanut butter pie.  How could I see something called a peanut butter pie and NOT make it?  

The peanut butter pie with cookie crust, as it's called in the book, called for a chocolate wafer, sugar and butter crust.  I even got the cookies they recommended ( Newman's Own organic) because I was at Whole Foods anyway, and well, because I had a big crush on the cookbook authors.  I had also bought the Whole Foods Groupon, so I was good to go.  

I used my magic bullet to grind up the cookies.  It doesn't work quite as well as a regular food processor, but it did the trick.  They got mixed with the butter and sugar and put in the fridge.  For the first layer of the pie, I mixed together the semisweet chocolate chips and light corn syrup in the double boiler and the spread it on the bottom of the pie as directed.  The next step was to mix cream cheese (I used light), peanut butter (I used natural), vanilla extract (I used vanilla extract), and dark brown sugar together with the paddle in a stand mixer.  Then, you take that out, put it aside and beat up some cream until it reaches soft peak.  Then mix them together.  Then you try not to eat all of the filling because it tastes really, really good. Then you put the peanut butter filling in the pie dish with the cookie crust and chocolate layer and put it in the freezer for up to three days.  

The recipe called for a fudge sauce, which I didn't do since I was going to be serving the pie at the bar and that seemed awkward.  

The only bone I have to pick with the recipe is that it said the pie cut clean from the freezer.  I did not find that.  The pie itself cut fine, but the crust was frozen solid and was very difficult to cut.  It involved a lot of standing up and pushing down and accidentally projecting pieces of peanut butter pie across the table.  When I make the recipe again (and I will be making this recipe again), I will remove it from the freezer in advance by about an hour or so and let it thaw a bit.  Or use a better knife.  In either case, it was fricken awesome.

The Sweet and Salty cake was a total putchke, and totally, 100% worth every ounce of its pain-in-the-butt-ness.  I burnt two full batches of caramel before I finally got it right, and if I had to do that every time, I would.  This cake was that good.

It was my friend Josh's birthday and it was a big one.  I figured a big birthday needed a big cake.  A spectacular cake.  And a cake with footballs on it.  Josh is a big football fan, it seemed called for.  I'm not going to put the recipe on here since I'm a librarian and have issues with copyright, but since Edd Kimber doesn't seem to have the same issues (we'll see what happens when HIS book comes out), I'll link you to his page for it. 

It took me three evenings to prepare everything for the pie and the cake.  I made the pie in one night (it was pretty straight forward), and made the chocolate layer cakes the same night.  These layer cakes are very impressive, they bake evenly and are quite tasty.

I also attempted to make the caramel for the salted caramel and whipped caramel ganache frosting on the first night.  After burning two batches and setting off the smoke detector once, I gave up on that.  On the first night I did also pipe white chocolate goal posts and stitching onto chocolate footballs (I will admit, I went a little crazy on this cake).

The second night I finally owned caramel.  I discovered that I could not either wait for the sugar syrup to reach 350 degrees on a candy thermometer, nor wait for the syrup to be a dark amber color.  I had to take the pot off the stove right when the syrup began to turn golden.  It would then finish cooking in the pot off the stove and would get to the correct color.  I never got it to 350 degrees.  I also made the whipped caramel ganache frosting on the second night.  It wasn't coming together as well as I had hoped it would, which I blamed on the Trader Joe's brand chocolate I had bought (it's was cheap!), but I think it had to do with the humidity in the kitchen.  I popped it in the fridge and left it overnight.

The next day, after eating the peanut butter pie, I had to come home and put the cake together.  The ganache was, of course, completely solid because that's what happens when you put something made with butter in the refrigerator overnight.  I let it soften a bit while I mixed up the decorator's icing for the grass.  

When the ganache was soft enough, I assembled the cake.  I didn't find that the salted caramel absorbed into each layer of the cake as much as I'd hoped it would, so it seemed kind of soupy.  I had outlined the top of each layer with the ganache using a piping bag though, so everything stayed pretty contained.  I then filled in the circle I'd made with ganache on top of the caramel, sprinkled it with fleur de sel and put on the next layer.  When all three layers were assembled, I crumb coated the way they instructed me to and then finished icing and decorating the cake with the grass icing, goal posts, footballs, and white chocolate lettering.  I was a bit concerned that the icing was going to begin to melt again because of the humidity, so I asked them to pop it back in the fridge at the restaurant.  They took it out about a half hour before we ate it and it was the perfect consistency. 

All in all, that cake kicked ass.  It really was the perfect combination of sweet and salty.  I think it was worthy of the birthday number it was celebrating and quite honestly, all the steps and hours aside, I can't wait to make it again!


Thursday, October 13, 2011

The New Cookbook

I have a confession to make.

I am cheating on Warren Brown (United Cakes of America).

I am cheating on Warren with Matt Lewis and Renato Poliafito.  They are the owners of Baked bakery in Brooklyn, and the author's of the cookbook Baked: new frontiers in baking.  Their cookbook is spectacular.  I learned about this cookbook from Edd Kimber's website.  He is the Boy Who Bakes and has his own cookbook coming out soon.  I got the recipe for Zivah's Grasshopper Cake from his website and discovered the other day that that recipe, among many others, actually came out of this book.  So, I stopped at my local, neighborhood independent bookstore on my way home from work (yay, indie bookstores!) and picked up a copy.  It is amazing.


Let me just list some of the recipes that are in this book:
sweet and salty cake and peanut butter pie, which I've now made.
Also, chipotle cheddar biscuits, pumpkin chocolate chip loaf, homemade granola, red hot red velvet cake (with cinnamon buttercream), lemon drop cake, coconut snowball cupcakes (coconut!!), ROOT BEER bundt cake, bourbon chocolate pecan pie, butterscotch pudding tarts, brownies (that are award-winning), shortbread, blondies with beer in them, monster cookies (with everything in them), and that's not even half the stuff!  Seriously, this cookbook is like a salivation monster.  And I don't even like sweets.

They also give adorable little suggestions, like about how to store stuff and easy decorations.  The pictures are gorgeous and the end papers are downright outstanding.
endpapers - it's deer!

I have only made two of the recipes from this book, but I am completely enamored.  I might even go to Brooklyn to see the bakery.  OK, let's not get ahead of ourselves here.

Well done, Misters Lewis and Poliafito, well done indeed.

Posts and pics from the Sweet and Salty cake and Peanut Butter Pie are coming up next.

Monday, October 10, 2011

Adventures in Canning

As the title of this post suggests, I recently went on an adventure in canning that was similar in extremes to Adventures in Babysitting.  No, it didn't have any blues-singing.  Or skyscraper-scaling.  Or guys named Thor.  Or babysitting for that matter.  OK, it wasn't really the least bit like Adventures in Babysitting, but it did have kids, and I had to get you to read it somehow!

Some backstory: When my oldest brother decides he's going to do something, he goes all the way.  This is the man who decided he wanted a wife, met a (lovely) woman, got engaged two months later, and was married about nine months after that.  He decided he wanted some kids, now they're on the fourth.  See, when he does stuff, he's all in, and he does it right.  So, last year, when he decided he wanted to can stuff (oh yeah, he's also my antithesis.  He's the country to my city, the tree to my telephone pole), he went out and got all the stuff he needed to can, and learned how to can all the way.  Therefore, when I decided to learn how to can, it wasn't just a pot on a stove for me, I went to the home of the master.  Besides, his kitchen is way bigger and way prettier.

Last year, I picked up some grapefruit marmalade at a farmer's market.  It was delicious; sweet and tart at the same time.  I haven't been able to find it anywhere, so I decided it was time to make it myself.  I also decided, since I was launching into the world of unknown cooking, that I wanted to pickle asparagus as well.  So, one weekend a few week ago, I went to my brother's house and canned stuff.  We canned just about everything that wasn't screwed down.  Of course, the only thing we didn't end up canning was asparagus, but that's because it's expensive in the fall and will have to wait until spring.

It seems, this city mouse learned, that pickling and canning are different.  I guess I really knew that, but it was clarified that weekend.  To make marmalade, you basically just have to make a big, sticky mess and then add more sugar than you ever want to see in one place (unless it's a Pixie Stick), and some pectin.  To pickle things, you need to cook them, typically in some sort of solution involving sugar, water, and vinegar.  To can things, you put them in fancy jars, clean their tops, put on lids and rings, and going against everything you've ever learned about boiling water and glass, you then dump the jars in a big pot of boiling water for a while and hope nothing explodes.

And you know what?  Nothing explodes!  It's like chemistry.  Or something.  In any case, it works.  And then you have pickles and jams and stuff forever!

We made grapefruit marmalade (which isn't really congealy enough), pickled green beans (which I don't love), pickled carrots, cauliflower and onions (which are awesome), and bread and butter pickles (which are super awesome, and a pain in the hiney to make).  The next week I went back and we made black forest jam (cherries and chocolate!), and apple, cranberry relish (yum!).

The best thing about the canned stuff is that it's so pretty.  The worst thing is that I have no place to store any of it.  The jar lids also get sticky and now I have a fridge filled with jars of half-eaten pickles that I can't open.  I'll work on that.

Aren't they pretty?!

Stop 27: Florida Key Lime Pie

So here's a good thing to know about me for anyone who decides that in a fit of retribution they suddenly want to bake for me: I love key lime pie.  I know I go on and on about not being much of a sweets person, and maybe it's because the key lime has that tart limey flavor to its sweetness, but I would eat just about anything you could think of to make out of  key lime juice.  Pie, cheesecake, tarts, whatever you can think of.  In Florida, in the grocery stores, they make a mango key lime pie, and they just have it there, waiting to be purchased and eaten.  It's a good thing I don't go to Florida all that often.

Brown's recipe for Key Lime Pie, representing Florida, quite appropriately, was a pretty typical recipe.  It is also probably the recipe of his that I messed with the most.  I made this pie for a BBQ I was having with my cousins at the very end of the summer.  All summer I was on something of a coconut kick, which led me to purchase Hawaiian Tropic suntan lotion (which is awesome), and spend many hours trying to find coconut-scented lotion.  Basically, I wanted to spend the summer smelling something like a beach mixed with a pina colada.

Because of my coconut kick, I decided to kick up the key lime pie a notch.  I made the graham cracker crust the way the book told me to, but I added some dried, sweetened coconut to the graham crackers and butter.  The pie was pretty basic, sweetened condensed milk, key lime juice (Brown recommended Nellie and Joe's and it did not disappoint - available at Whole Foods, btw) and eggs.  I left the custard filling alone.  What I messed with the most, was the topping.

Brown wanted me to top the pie with a meringue.  I refused.  For one thing, I don't like meringue.  For another, meringue does not belong on key lime pie, it's just not natural.  I think it was Brown trying to find something to do with the whites of the eggs that weren't used in the pie.  Whatever the reason, I went in another direction.  I made fresh whipped cream.  But I didn't just whip up some cream and sugar.  No, I whipped up cream, sugar, vanilla seed, coconut rum and key lime juice.  And I want to say right here and now, I would have bathed in that concoction.  It was DELICIOUS.

Then I toasted up some dried coconut and sprinkled it on top.  Seriously, key lime pie is probably one of the easiest things to make, and easiest things to make look really impressive.  If anyone wants this recipe, just ask.  It's worth sharing -- at least with my adjustments it is :-)

The pictures I took weren't the best, but here's the idea:


Next we're taking a diversion from the road trip and going on a canning adventure!