Alright, so it's not really an olive oil pie, but it was an olive oil pie crust and it was shockingly awesome, so I wanted to get your attention.
I am on a constant plight for good foods to bring for lunch. I am not much of a sandwich person and it seems there are only so many days in a row you can eat sesame noodles. Actually, for me, about three days is my top out for the number of days I can eat the same thing in a row. I've always envied people who have a regular. But, I digress. The latest idea I had in my "things I can bring for lunch" mission, is quiche. I like quiche, you can eat it cold, warm, it's got stuff in it and, if made with Sarah-magic (i.e. translate anything that says cream into something non-fat), can be reasonably health conscious.
But then there's the crust and as with all pie-type things, crust is out to get me. How can I put two sticks of butter into a crust? I mean, if I'm not going to go to the gym (and it seems I'm not), I just can't rationalize putting two sticks of butter in anything I'm going to eat. So I went on a hunt for healthy crust. What I found wasn't necessarily "healthy" but it was definitely "healthier". Olive oil crust. It's weird, you have to freeze the olive oil until it solidifies, kind of, and then cut it in like you would normal crust. To be honest, I was pretty sure I was going to end up with a pile of egg and flour goo in the oven because all the oil was just going to melt away. I was pleasantly surprised though. It really is delicious and flakier than a normal butter crust.
I didn't take pics of the crust because I didn't think of it in time, but I took pictures of the after. I made six mini quiches and one large. The mini's were better, I think because I handled the dough less. The dough in the large was a bit more rubbery.
I got the dough recipe here (don't ask me about the vinegar, I have no idea). It made enough for the six mini's (in muffin tins) and one large and I tossed a little at the end. The quiche recipe is after the pics for those who want it. Note, this crust recipe takes forever, so starting the night before you want to use it is recommended.
half-eaten piece of the large pie
mini pie (yum)
Mushroom and Shallot Quiche
(this recipe is originally from Epicurious.com, but what they "recommended" and what I did ended up being quite different (shockingly), so here's what I used:
olive oil
2 medium shallots- chopped
1/2 lb mushrooms- sliced
3 eggs
1 c milk (I used 1%)
salt and pepper
Blue cheese (how do you measure "whatever was left in the block that I didn't eat yesterday"?)- crumbled
olive oil crust- blind baked and cooled
Preheat oven to 350
I sauteed the shallots in olive oil until soft, then added the mushrooms and kept cooking until they were soft. Pop the mushroom mixture in the fridge to cool.
Meanwhile, whisk the eggs, milk, salt and pepper together.
When the mushroom mixture is kind of cool (enough to not burn your fingers at least), spread it on the bottom of the crust or mini crusts, cover with egg mixture and then spread cheese in. I might make sure the cheese is a bit more mixed in next time.
The recipe called to cook the quiche for 25 minutes and the minis were pretty much done by then, I think I left them in for an extra 3 minutes, but I like my quiche dry. The large pie wasn't quite done after the 28 minutes. At this point I had to leave so I just turned the oven off and let of keep cooking figuring it might end up a little dry (really, quiche can't be too dry for me), but it ended up just perfect, still moist, so I'd say closer to 30-35 minutes for the big one.
Chill for a bit and then eat (yum)
Thursday, November 12, 2009
Friday, November 6, 2009
The Iceberg Cake
While creating the disasterous penguin cupcakes, I also took it upon myself to make a birthday cake for the nephew in questions, since I was going to see him that night, but not at his party. Sticking with the penguin theme, I had purchased some chocolate penguins from Burdick a few nights before and planned on putting them on a cake that looked like the ocean, sitting on some icebergs. The whole thing came off pretty much as planned, though I would have preferred the water to have more diversity of color and to be so teal. I also had to ditch the original plan of creating some sort of marshmallow iceberg after both my father and made numerous sticky attempts before remembering that there's a reason we're not structural engineers. The chocolate penguins were tasty (though maybe not enough so for what they cost...).
After all this, I think next year I'm buying the kid a pizza.
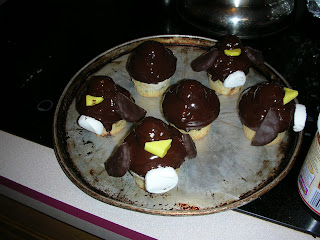
The Penguin Cupcakes
...or, why I am pretty sure I hate Hello, Cupcake!
Hello, Cupcake! is a cupcake recipe book. It's one of those books that has the subtitle "Anyone can do it!!!" and then you turn to the back of the book and find out it was written by two experienced, gourmet chefs. In all honestly, anyone could make these cupcakes, I'm just not sure why anyone would want to. It's one of those books that creates things out of things that are already made, like canned frosting, candy shaped like fruit, jelly beans, etc. The cupcakes look cool, but when it comes down to it, I can't imagine wanting to eat any of the creations.
The penguin cupcakes were for my nephew's 8th birthday party. He is having a sleepover, and I think 8 year old boys are the only people in the world these "cupcakes" are decent to be ingested by.
You start by using frosting (I made my own) to glue a mini donut cut in half to the top of the cupcake. I know, I should really just stop here... Then, you use more frosting to glue a donut hole to the middle of the donut, creating a bowling pin-looking thing. To begin with, I couldn't find plain mini-donuts, so I got chocolate frosted. I also couldn't find donut holes that weren't powdered, so I got those frererochepan chocolate things that they advertise on TV all the time.
After you have glued this concoction together, you cover them in frosting and put the whole thing in the freezer for a while. In the meantime, microwave some canned chocolate frosting (I used canned for this part). I was supposed to dye the frosting black, but my black food color had congealed, so we had brown penguins.
Once the penguins were frozen, I was supposed to dip them upside down into the melted frosting. To be honest, this worked surprisingly well. The problem was that my dipped cupcakes did not look like smooth beautiful, tall, penguins. They looked like slightly overweight chickens. I know, I know, I used the wrong ingredients, but come on, anybody can do it...
Anyway, then I was supposed to use half a yellow Starburst for the beak, the end of a marshmallow for the belly and chocolate cookies cut in half for the wings. I think the chocolate cookies are the only part I have any interest in eating of that whole concoction.
Step one
All glued up and ready to be frozen
My dipped blobs, I mean penguin bodies...
Some are penguins, some are not
Ok, so in the end they turned out kind of cute. If you like slightly overweight chickens made of choloesterol with marshmallow stomachs.
These are my favorites. The one on the right looks skeptical, like he knows he's not really a penguin.
The Chocolate Sushi
I was on Tastespotting the other day (shock of shocks...) and I saw this link to a posting on chocolate sushi. It looked fun and easy and kind of awesome. Thus begins my series of posts on things that look easier than they are and how the internet is full of trickery (and perhaps evil, but that might just be too much listening to Harry Potter).
I decided to make this chocolate sushi for my friend's Halloween party. The loose thought was that this was ingredients dressed up as sushi. I bought mint, strawberries, blackberries, and, in a fit of creativity, a pomegranate to put in the sushi. I then began the disaster... It really wasn't that bad, but following directions that say things like, " let cool a bit and stir in corn syrup. wrap tightly and refrigerate to desired consistency. knead and roll into desired shapes." isn't helpful for me. It's not the blogger's fault. She probably already knew how to make modeling chocolate. I didn't. Anyway, the kitchen ended up caked in chocolate and stickiness, but the sushi was up kind of cool. I'm not sure it's really finger food by the time all is said and done. It looks pretty authentic, but I don't think I'll be taking that one again any time soon (sorry Matt).
Subscribe to:
Posts (Atom)