Sunday, August 29, 2010

The Bucket Cake

I finally made the bucket cake.  I had seen this cake numerous times in different posts and on blogs and it looked awesome.  And easy.  So I thought I'd give it a try for a party some friends were having.  It was an end of summer/birthday, basically, the perfect excuse for a cake that looks for a bucket filled with M&Ms.

So I made it and it turned out alright, but in all honesty, it was kind of a pain in the butt.  It was a pain to put together and an even bigger pain to cut.  Nobody on the blog posts I had read mentioned that it is almost impossible to cut through M&Ms that had been glued into place with icing and then put in a refrigerator for two days.  Although it looked great in the end, and numerous people actually attempted to put their hands in it to reach for candy, I am not sure I would do it again for the pure pain-in-the-butt factor...


I will openly admit that I made these cakes from a mix.  Duncan Hines and I have had some nice times together, and I didn't see any reason to break that up now.  

I also made two cakes with the full intention of taking them to two different parties.  I didn't make it to one party and that cake is now in my freezer where it will probably remain for the next six months when I remember it's in there and throw it away.


I did make the frosting from scratch (regular decorator's buttercream - powdered sugar, butter, vanilla...), but obviously bought the candy. 
Here it is in all it's glory,  I think it looked better in person.  I found the best way to do it was actually to ice the top and shove the M&Ms in first.  I started by dumping a bunch on an pressing them in and the used more to fill in the white spots.  It might have worked better if I had started with colored icing, maybe brown.  Then, breaking the Kit-Kat bars into twos, I spread frosting on the bottom and pressed it to the side of the cake.  This also worked better than putting the frosting on the cake and pushing the Kit-Kats on.  The frosting dried to fast.  

Although I'm not typically a fan, I might even say canned frosting would work well for this.  It would have been slimier than what I made and might have held everything in place better.  Maybe the chocolate fudge in a can...

Regardless of my personal issues with the cake, it looked fun and tasted sugary-delicious and people enjoyed it in a "diabetic-coma-inducing" kind of way.

Monday, August 23, 2010

The Un-Grilled Cookies

It's a rainy day on the Cape.  The wind is gusting at 45 mph.  It is a day for tea and cookies.  Alas, it is the Cape, so we have no cookies that aren't soft with moisture.  Ahh, humidity...

Point of the story: I made cookies.  I used the grill cookbook like usual, but it's raining, so I baked them inside.  It was novel, using the oven in the summer to bake. 

Chunky Chewy Chocolate Cookies a la Sarah (i.e. I replaced the ingredients I didn't have with what I found in the house)
1/2 cup unsalted butter
1 package (11.5 ounces) semisweet chocolate chunks, divided
3 large eggs
1 cup light brown sugar, firmly packed (only had dark brown sugar, so I used about 3/4 cup)
1 teaspoon vanilla extract
2 cups all-purpose flour
1/2 cup cocoa
1/2 teaspoon baking powder
1/2 teaspoon salt
1 cup coarsely chopped walnuts (didn't use)
1 cup shredded coconut (Didn't use - used butterscotch chips instead)
1 cup raisins or dried cherries, or use half of each

1. In a small saucepan over very low heat, melt the butter with 1/2 package (about 1 cup) of the chocolate chunks, stirring constantly until smooth. Set aside to cool to lukewarm.   I used the double boiler.  I never understand why I should stir constantly if I can just let something cook for a while in a double boiler.

2. Prepare the grill for indirect cooking over medium heat (about 350°F).  (I preheated the oven to 350)

3. In a large bowl using an electric mixer, beat the eggs, brown sugar, and vanilla until light and fluffy. Beat in the cooled butter-chocolate mixture.

4. In a medium bowl sift the flour, cocoa, baking powder, and salt. Gradually stir into the large bowl of batter. Add the walnuts, coconut, raisins and/or cherries, and the remaining 1 cup of chocolate chunks; stir to blend. The batter will be stiff.

5. Use a tablespoon and wet fingertips to drop 1-inch mounds of the batter onto a cookie sheet lined with parchment paper, keeping the mounds about 2 inches apart (the cookies do not spread when baked). Grill, in batches, over indirect medium heat, with the lid closed as much as possible, for 20 minutes, keeping the grill's temperature as close to 350°F as possible. Let the cookies cool on the cookie sheet until they are easy to remove with a spatula, 2 to 3 minutes, and then transfer to a cooling rack and allow them to cool completely.  I baked them for about 22 minutes.

Makes about 36 cookies

They came out very interestingly.   They kind of have a brownie-like consistency, definitely dense, but moist as well.  They're good, though not my favorite cookies of all time.  I'm not huge on chocolate-chocolate chip in general, so probably not the best judge.  They look awesome and don't spread at all when baking, so you can really jam them on the tray.  I think they'll do better when cooler.

I have pics, but the net down here won't ever let me load them, so I'll put them on when I get home.

http://weber.com/grillout/RecipeDetails.aspx?key=148&cid=8This picture is from the Weber website.

Sunday, August 22, 2010

The Peanut Butter-Chocolate-Peanut Butter Cake (again)

I am naming 2010 the Year of Peanut Butter.

When asked what kind of cake she would like for her birthday, my friend Patti responded with a dainty, "chocolate peanut butter, please."  And so, I recreated the chocolate peanut butter chocolate cake from a few months ago. 

This time, don't tell, but I totally cheated.  I used a chocolate cake mix.  I made the ganache and buttercream from scratch, but the problem is the the chocolate cake from a cake mix really tastes as good as anything I make from scratch.  Often, it's better.  Chemicals make for good moisture, what can I say?

Anyway, here it is C-PB-C take two:
Patti enjoying her cake.


Friday, August 13, 2010

The Peanut Butter Cupcakes

It is my friend Anne (of guest-post fame)'s birthday tonight and therefore, I decided to make cupcakes.  I knew peanut butter was going to be making an appearance, and I was pretty sure about chocolate, but it took a while to figure out what the plan was.  Finally, I decided that this would be a good chance to play with the filling tip I bought the other day, so I decided to make peanut butter cup cakes and fill half with chocolate frosting and the other half with fluff, ice them with peanut butter buttercream and decorate with cuteness.  

After a bit of searching (and rejecting Paula Deen), I found a recipe for peanut butter cake that sounded peanut buttery enough on the "I Heart Cuppy Cakes" blog.  For the record, I do not approve of the name of this blog.  Recipe is in the link and posted below.

Peanut butter, vanilla, egg, butter, brown sugar, flour and baking powder, what could be bad?
I used the same frosting recipe as for the Chocolate Peanut Butter Awesomeness cake (also posted below)
The cupcakes looked and smelled like big peanut butter cookies.  Well, I guess they looked big, but smelled like normal peanut butter cookies.
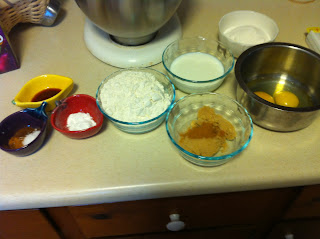
I needed a variety of ingredients for the filling and topping.  I affectionately refer to this picture as Sugar High.
Half got filled with marshmallow fluff. The other half with chocolate frosting (which, yes, I bought, I was not going to make a 1/2 Cup of chocolate frosting). I should mention at this point that I had never filled cupcakes before.  And, honestly, I don't think I'll be doing it again anytime soon.  The tip is a 2" long metal tip that you're supposed to shove into the cupcake and squeeze.  I read the directions that came with it and it basically said, "shove the tip in the cupcake and fill with desired amount of filling, then release."  So, you know, that was helpful.  Because of the awesome instructions and my naivete, this did not go quite according to plan.  I pushed and I shoved and my pastry bag exploded three times.  It was gooey, and I thought the only thing to do with the exploded fluff was to eat it.  It was very yummy and I will be doing about 1,000 sit-ups later...  The chocolate ones filled slightly better, though I still really have no idea if there's actually anything inside them.  


  Somewhere on the internets I had seen someone decorate cupcakes with mini peanut butter cups disguised as mini-cupcakes, and I thought that was the CUTEST IDEA EVER.  So I stole it.  I apologize to whomever I am stealing from, but I have no recollection of where I saw it.  I used a small start tip to swirl frosting onto the peanut butter cups and made the look super cute. 


I thought since I was using peanut butter cups for the cupcakes filled with chocolate, that I should also have something to depict the cupcakes filled with fluff.  I found mini Charleston Chews at the store, so used them.  I think they're super cute too.

 
Attempting to pretend I know how to take a picture, I placed the cupcakes on white paper for a solid background(?).  I am including these next two images just in case anyone ever wondered what a mug shot of a cupcake would look like.

Recipes:
Peanut Butter Cupcakes
Makes 12 cupcakes (I got 14)

INGREDIENTS
For cupcakes
1 cup all purpose flour
1 tsp baking powder
1/4 tsp salt
6 tbsp (3/4 stick) unsalted butter, softened
3/4 cup smooth peanut butter, room temp
1 cup brown sugar
1 egg
1 tsp vanilla extract
1/2 cup milk


INSTRUCTIONS
Preheat oven to 350F. Line muffin tin cupcs with paper cupcake liners
Sift flour, baking powder and salt into a medium bowl and set aside
In a large bowl, using an electric mixer on medium speed, beat the butter, peanut butter and brown sugar until smoothly blended and lightened in color, about 1 minute. Stop the mixer and scrape down the sides of the bowl as needed during mixing. Mix in egg. Add vanilla and beat for 1 minute or until batter smooth.
On low speed, add the flour mixture in 3 additions and the milk in 2 additions, beginning and ending with the flour mixture and mixing until the flour is incorporated and the batter looks smooth.
Fill each liner with a generous 1/4 cup of batter, to about 1/3 inch below the top of the liner. Bake just until the tops feel firm and are lightly browned and a toothpic inserted in the center comes out clean, about 22 minutes. There will be cracks on the top. Cool cupcakes for 10 minutes in the pan on wire rack.

Peanut Butter Buttercream
(Cooks Illustrated, March 2005)
Ingredients
8 tablespoons unsalted butter, softened
1/2 cup smooth peanut butter (don't use old-fashioned or natural brand)
3/4 cups confectioners' sugar

Pinch table salt
1/2 teaspoon vanilla extract
1 tablespoon heavy cream

Instructions: 

In standing mixer fitted with whisk attachment, beat butter and peanut butter at medium-high speed until smooth, about 20 seconds. Add confectioners' sugar and salt; beat at medium-low speed until most of the sugar is moistened, about 45 seconds. Scrape down bowl and beat at medium speed until mixture is fully combined, about 15 seconds; scrape bowl, add vanilla and heavy cream, and beat at medium speed until incorporated, about 10 seconds, then increase speed to medium-high and beat until light and fluffy, about 4 minutes, scraping down bowl once or twice.

Tuesday, August 3, 2010

The Apple Cake

I've been on this baking-on-the-grill kick this summer and I realized that I never posted about the apple cake, which was the first thing I ever baked on the grill.  I think this one is the tastiest, followed closely by the vanilla cake used in Maggie's birthday cake

The apple cake recipe cake from the Weber's Real Grilling book as well.  I don't follow the directions 100% because they want you to cut in the butter and I want to do the whole thing in the mix master. 

I've made this twice with apples and once with plums and each time it's bee successful.  The one time I use the food processor instead of the mixer the batter was a little too thin and the consistency wasn't the same, but the flavor was good. 

Here are the recipe, links and pics:  
Apple Cake with Cinnamon Sugar 

Prep Time30 minutes 

Grilling Time35 to 40 minutes

Batter

5 tablespoons unsalted butter, cold, plus more for greasing the pie pan
1-1/4 cups all-purpose flour
1-1/4 teaspoons baking powder
1/2 cup granulated sugar
1/2 teaspoon kosher salt
1/4 teaspoon ground cinnamon
1/8 teaspoon ground cloves
1/2 cup whole milk (I used 2%)
2 large eggs, at room temperature
1/2 teaspoon pure vanilla extract

Topping
1 large Granny Smith apple (I used a mac, it was what I had)
2 tablespoons dark brown sugar
1/4 teaspoon ground cinnamon
1 cup heavy cream, whipped (optional)

1. Prepare the grill for indirect cooking over medium heat (350° to 450°F).

2. Generously grease a 10-inch metal pie pan with butter. Sift the flour and baking powder into a large bowl. Add the sugar, salt, cinnamon, and cloves and mix well. Cut the 5 tablespoons of butter into small pieces and add to the bowl, mixing with your fingertips until you have a coarse meal. Whisk the milk, eggs, and vanilla and add to the bowl. Mix well. The batter should be well combined but still have some lumps. Pour the batter evenly into the pie pan.

3. Core and then slice the apple lengthwise into 1/8-inch thick slices. Arrange the slices on top of the batter around the outer edge of the pie pan, like petals of a flower, overlapping them slightly. In a small bowl mix the brown sugar and cinnamon. Sprinkle evenly over the top of the apples and batter.

4. Grill over indirect medium heat, with the lid closed, for 20 minutes. Rotate the pan 90 degrees. Continue grilling, with the lid closed, until a skewer inserted in the center comes out clean, 15 to 20 minutes more. Cool on a wire rack for 15 minutes. Cut into wedges and serve at room temperature with whipped cream, if desired.

Makes 6 to 8 servings


Again, I combined everything in the mix master, and it came out fine.  Indirect Medium Head, by the way, is when the front and the back burners are on medium and the middle burner is off.  You put the pan right in the middle of the grill.  By turning it half way through, it cooks evenly.

  I am loving this prepping all the ingredients before you start cooking thing.  Not only does it save time and clean-up, but it forces me to read the recipe in advance, which is something I typically forget to do.


I think this is sideways, but it's the cake ready to go into the oven.
Yummy